前言:
在PVE日常使用中如果有多ip分配的话,手动其实算是一个很大的工作量。本文白话记录v4与v6的获取,实现一次设置终身解放。笑。。。。。
准备工作:
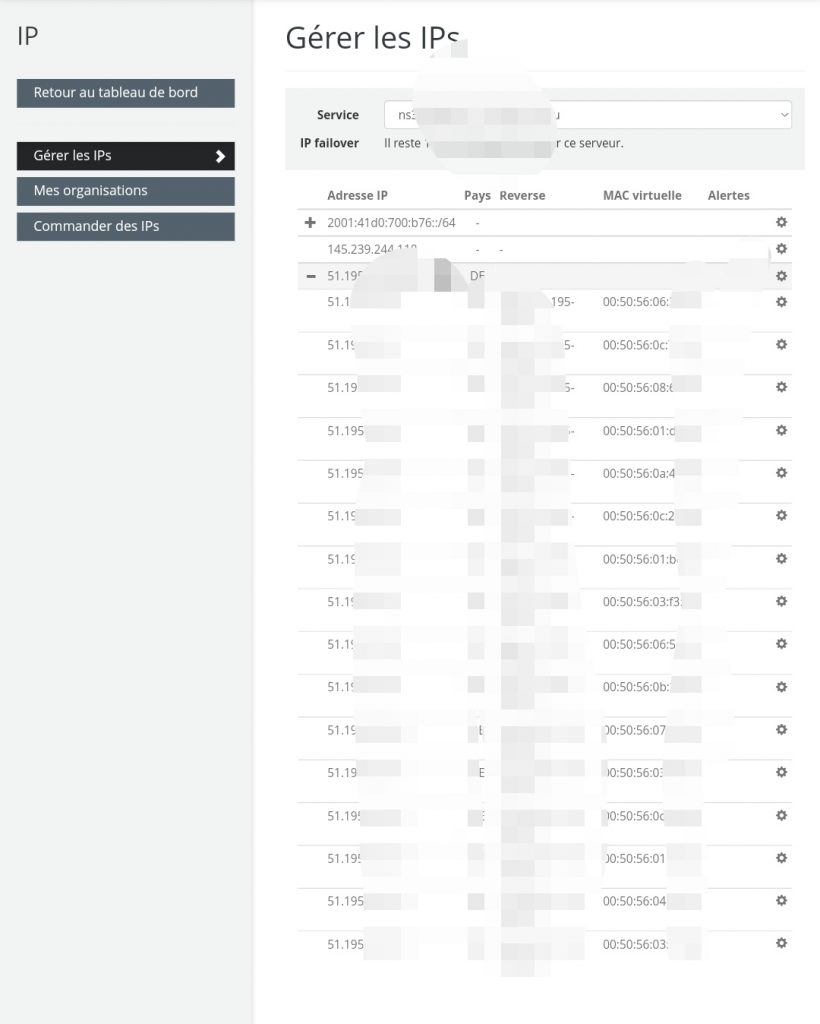
来到ovh或者sys的后台ip所在页面,生成对应的mac
配置网卡参数:
打开并编辑/etc/network/interfaces
 1
 2
 3
 4
 5
 6
 7
 8
 9
10
11
12
13
14
15
16
17
18
19
20
21
22
23
24
25
26
27
28
29
30
31
32
33
34
35
36
37
38
39
40
41
42
43
44
45
46
47
|
auto lo
iface lo inet loopback

iface eno3 inet manual

auto vmbr0
iface vmbr0 inet static
   address 服务器ip/24
   gateway 网关
   bridge-ports eno3
   bridge-stp off
   bridge-fd 0
iface vmbr0 inet6 static
     address 这里ipv6分配个/128
     gateway 网关这里来个::1

iface eno1 inet manual
iface eno2 inet manual
iface eno4 inet manual

auto vmbr1
iface vmbr1 inet static
     address 192.168.0.1/24
     bridge_ports none
     bridge_stp off
     bridge_fd 0
     bridge-vlan-aware yes
   bridge-vids 2-4094
     #转发ip4流量到小鸡使其可以连接外网
post-up echo 1 > /proc/sys/net/ipv4/ip_forward
post-up iptables -t nat -A POSTROUTING -s '192.168.0.1/24' -o vmbr0 -j MASQUERADE
post-down iptables -t nat -D POSTROUTING -s '192.168.0.1/24' -o vmbr0 -j MASQUERADE

iface vmbr1 inet6 static
     address 2001:xxxx:303:xxxx::3/64
up ip -6 route add 2001:xxxx:303:xxxx::/64 dev vmbr1
  post-down ip -6 route del 2001:xxxx:303:xxxx::/64 dev vmbr1


post-up iptables -t nat -A PREROUTING -i vmbr0 -p tcp --dport 222 -j DNAT --to 192.168.0.3:22
     post-down iptables -t nat -D PREROUTING -i vmbr0 -p tcp --dport 222 -j DNAT --to 192.168.0.3:22
     post-up iptables -t nat -A PREROUTING -i vmbr0 -p tcp --dport 80 -j DNAT --to 192.168.0.3:80
     post-down iptables -t nat -D PREROUTING -i vmbr0 -p tcp --dport 80 -j DNAT --to 192.168.0.3:80
     post-up iptables -t nat -A PREROUTING -i vmbr0 -p tcp --dport 443 -j DNAT --to 192.168.0.3:443
     post-down iptables -t nat -D PREROUTING -i vmbr0 -p tcp --dport 443 -j DNAT --to 192.168.0.3:443
     post-up iptables -t nat -A PREROUTING -i vmbr0 -p tcp --dport 8888 -j DNAT --to 192.168.0.3:8888
     post-down iptables -t nat -D PREROUTING -i vmbr0 -p tcp --dport 8888 -j DNAT --to 192.168.0.3:8888
|
 1
 2
 3
 4
 5
 6
 7
 8
 9
10
11
12
13
14
15
16
17
18
|
net.ipv4.tcp_congestion_control=bbr
net.core.default_qdisc=fq
net.ipv4.conf.all.rp_filter=1
net.ipv4.icmp_echo_ignore_broadcasts=1
net.ipv4.conf.default.forwarding=1
net.ipv4.conf.default.proxy_arp = 0
net.ipv4.ip_forward=1
kernel.sysrq = 1
net.ipv4.conf.default.send_redirects = 1
net.ipv4.conf.all.send_redirects = 0
net.ipv4.ip_forward=1
net.ipv6.conf.all.accept_dad = 1
net.ipv6.conf.all.accept_ra = 0
net.ipv6.conf.all.accept_redirects = 1
net.ipv6.conf.all.accept_source_route = 0
net.ipv6.conf.all.autoconf = 0
net.ipv6.conf.all.disable_ipv6 = 0
net.ipv6.conf.all.forwarding=1
|
配置DHCP v4
1
2
3
4
|
apt install isc-dhcp-server  # 安装hdcp
systemctl status isc-dhcp-server #启动查看状态
service isc-dhcp-server restart  #重启dhcp
systemctl enable isc-dhcp-server  #开机启动
|
- 找到并编辑/etc/default/isc-dhcp-server
1
2
|
INTERFACESv4="vmbr0"
#INTERFACESv6=""
|
- 找到并编辑/etc/dhcp/dhcpd.conf
 1
 2
 3
 4
 5
 6
 7
 8
 9
10
11
12
13
14
15
16
17
18
19
20
21
22
23
|
subnet 0.0.0.0 netmask 0.0.0.0 {
authoritative;
default-lease-time 21600000;
max-lease-time 432000000;
}

# Bind IP by MAC
host VM1 {

# MAC Address
hardware ethernet x:x:x:x:x:x;

# Gateway
option routers x.x.x.x;

# Subnet
option subnet-mask 255.255.255.0;

# Failover IP
fixed-address x.x.x.x;

# DNS server
option domain-name-servers 8.8.8.8,8.8.4.4;
|
绑定以此类推vm1,vm2,vm3,。。。。。。
配置DHCP v6
1
2
3
4
|
apt install radvd   #安装
radvdservice radvd restart  #重启
radvdstatus radvd     #启动
radvdsystemctl enable radvd   #开机启动
|
 1
 2
 3
 4
 5
 6
 7
 8
 9
10
11
12
|
interface vmbr0
{
        AdvSendAdvert on;
        MinRtrAdvInterval 30;
        MaxRtrAdvInterval 100;
        prefix xxxx:abc0:1234:79::/64
        {
                AdvOnLink on;
                AdvAutonomous on;
                AdvRouterAddr on;
        };
};
|
配置pve
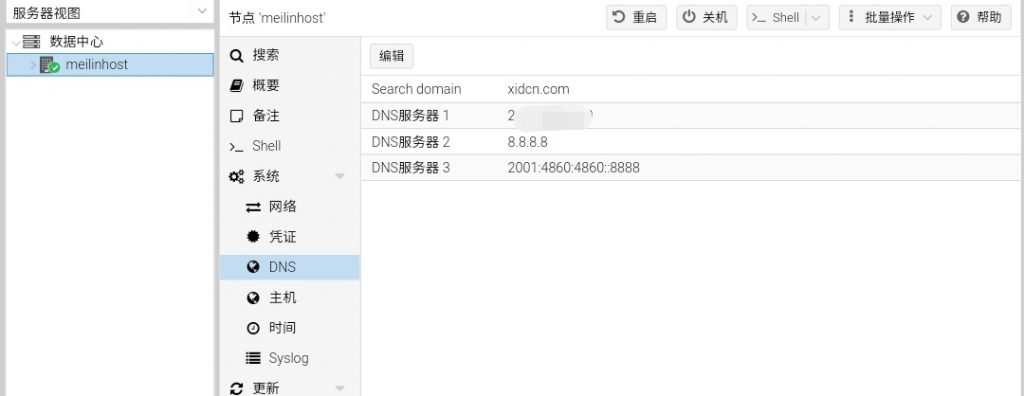
- 在pve中找到DNS,添加一个DNS服务器用来解析v6地址,博主用谷歌v6DNS

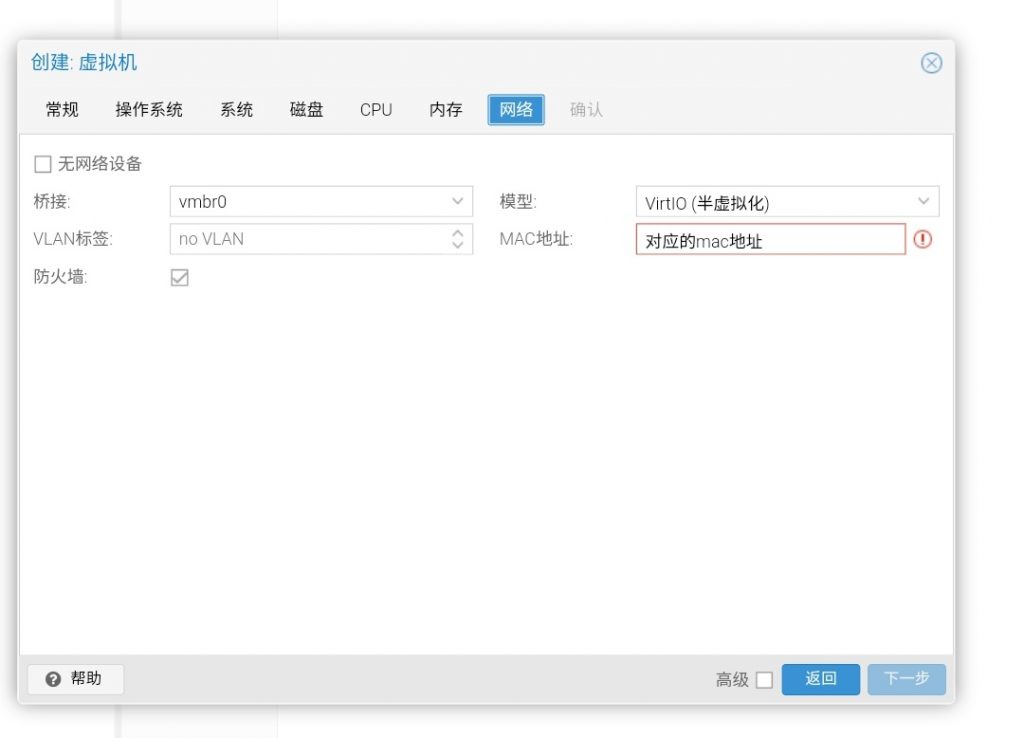
创建虚拟机
创建一个虚拟机,别忘记将ovh或sys的ip地址mac绑定上去


 支付宝
支付宝
 微信
微信