问:为什么需要一个无盘媒体影音库?
答:因为穷
起因是前段时间,买了一台N100先锋V2用来搭建我的轻nas,顺便替换掉我的J4125。
N100可以实现5个NVMe硬盘,但是固态的价格没赶上好时候,那么媒体影音库就得推迟实现吗?答案是否定的,刚好手里有个天翼的10T账户,拿来观影挺合适,如果你手里有115的永V 那就更合适了。
直通核显
使用大佬的一键脚本开启直通,srivo也行但不在本次教程中演示
1
|
wget -q -O /root/pve_source.tar.gz 'https://bbs.x86pi.cn/file/topic/2024-01-06/file/24f723efc6ab4913b1f99c97a1d1a472b2.gz' && tar zxvf /root/pve_source.tar.gz && /root/./pve_source
|
LXC容器部署
-
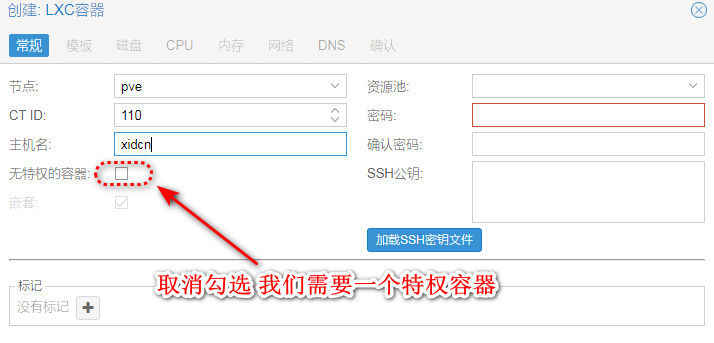
PVE 中下载Debian CT模板 (这里以Debian11为例)
-
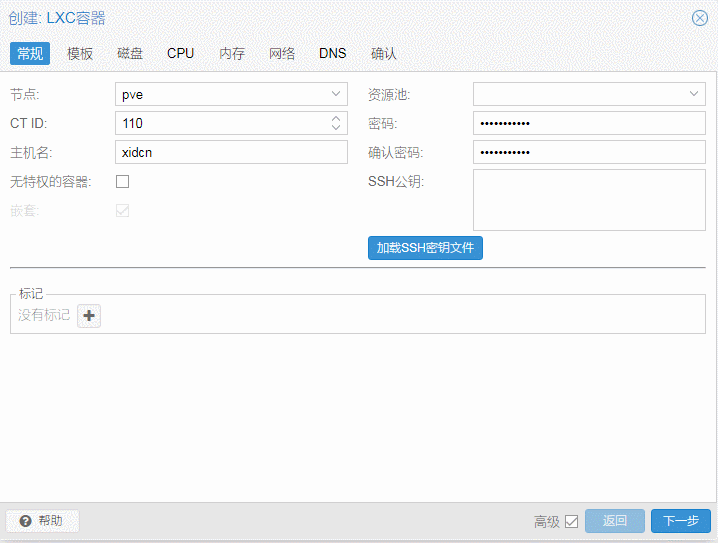
创建CT过程中把非特权容器前面的勾去掉
-
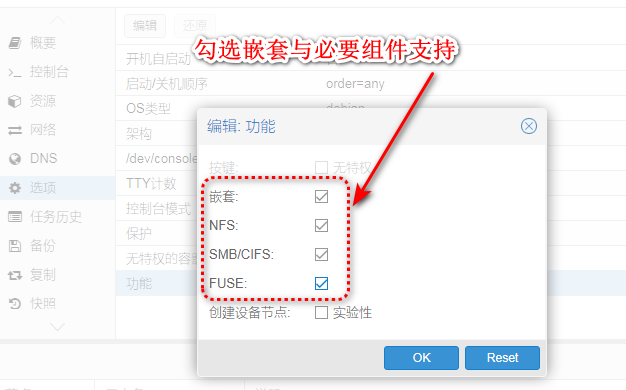
开启嵌套,NFS,SMB,SUFE(clouddrive要用到)

查看核显驱动
有 renderD128 和 card0 就正常
开启低电压编码器HUC GUC
修改
1
|
nano /etc/modprobe.d/i915.conf
|
添加
1
|
options i915 enable_guc=3
|
开启外部root登录
修改
1
|
nano /etc/ssh/sshd_config
|
修改或者直接添加
1
2
|
PermitRootLogin yes
PasswordAuthentication yes
|
更换Debian源
备份原文件
1
|
mv /etc/apt/sources.list /etc/apt/sources.list.bk
|
然后编辑
1
|
nano /etc/apt/sources.list
|
修改为
 1
 2
 3
 4
 5
 6
 7
 8
 9
10
|
# 中科大源

deb https://mirrors.ustc.edu.cn/debian/ bullseye main non-free contrib
deb-src https://mirrors.ustc.edu.cn/debian/ bullseye main non-free contrib
deb https://mirrors.ustc.edu.cn/debian-security/ bullseye-security main
deb-src https://mirrors.ustc.edu.cn/debian-security/ bullseye-security main
deb https://mirrors.ustc.edu.cn/debian/ bullseye-updates main non-free contrib
deb-src https://mirrors.ustc.edu.cn/debian/ bullseye-updates main non-free contrib
deb https://mirrors.ustc.edu.cn/debian/ bullseye-backports main non-free contrib
deb-src https://mirrors.ustc.edu.cn/debian/ bullseye-backports main non-free contrib
|
更新
1
|
apt update && apt upgrade -y
|
修改容器参数
1
|
nano /etc/pve/lxc/110.conf
|
添加
1
2
3
4
5
|
lxc.cgroup2.devices.allow: c 226:0 rwm
lxc.cgroup2.devices.allow: c 226:128 rwm
lxc.apparmor.profile: unconfined
lxc.autodev: 1
lxc.hook.autodev: /var/lib/lxc/110/mount_hook.sh
|
修改mount_hook.sh 开机脚本
1
|
nano /var/lib/lxc/110/mount_hook.sh
|
添加
1
2
3
4
5
6
|
#!/bin/bash

mkdir -p ${LXC_ROOTFS_MOUNT}/dev/dri
mknod -m 666 ${LXC_ROOTFS_MOUNT}/dev/dri/card0 c 226 0
mknod -m 666 ${LXC_ROOTFS_MOUNT}/dev/dri/renderD128 c 226 128
|
安装docker
1
2
|
apt install curl -y
curl -sSL https://get.docker.com/ | sh
|
启动docker服务
安装portainer
管理:http://ip:9000
1
|
docker run -d -p 9000:9000 -v /var/run/docker.sock:/var/run/docker.sock --restart=always --name portainer portainer/portainer-ce
|
安装 clouddrive2
管理:http://ip:19798
一键脚本
1
|
curl -fsSL "https://raw.githubusercontent.com/sublaim/clouddrive2/main/cd2.sh" | bash -s install
|
登录并设置挂载
安装N大Jellyfin
1
|
docker run -d -p 8096:8096 -p 8920:8920 --volume jellyfin-config:/config --volume jellyfin-cache:/cache -v /mnt/share_nfs:/media --device=/dev/dri:/dev/dri --restart=always --name jellyfin nyanmisaka/jellyfin:240126-amd64
|
编辑容器,关闭自启动,修改媒体库为刚刚cd2设置的挂载点
安装GPU监控应用
1
|
apt-get update && apt install intel-gpu-tools
|
解决LXC后cd2报 IO Error mount point is not empty 错误问题
前提条件是关闭jellyfin 自动启动,因为它启动的早于cd2挂载,到时cd2不再挂载
关闭jellyfin容器自动启动 用系统的systemd 给容器延迟20秒启动 让它启动在挂载后面
先通过以下命令对systemd注入rc-local服务:
 1
 2
 3
 4
 5
 6
 7
 8
 9
10
11
12
13
14
15
16
|
cat>>/etc/systemd/system/rc-local.service<<EOF

[Unit]
Description=/etc/rc.local
ConditionPathExists=/etc/rc.local
[Service]
Type=forking
ExecStart=/etc/rc.local start
TimeoutSec=0
StandardOutput=tty

RemainAfterExit=yes
SysVStartPriority=99
[Install]
WantedBy=multi-user.target
EOF
|
然后执行开机启动rc.local
1
|
systemctl enable rc-local.service
|
创建开始脚本
1
2
3
4
5
6
|
cat <<EOF >/etc/rc.local
#!/bin/bash
sleep 20
docker start jellyfin
exit 0
EOF
|
并给文件赋权限
启动 rc-local 服务:
1
|
systemctl enable --now rc-local
|
查看 rc-local 状态
1
|
systemctl status rc-local.service
|
LXC使用下来发现PVE内存会溢出不释放,然后我又用KVM建了一个,各位按需选择
KVM虚拟机部署
首先还是下载debian镜像并上传至pve
1
|
https://gemmei.ftp.acc.umu.se/debian-cd/current/amd64/iso-cd/debian-12.4.0-amd64-netinst.iso
|
安装虚拟机并直通核显(虚拟机安装没什么好讲的,这里跳过)
开启外部root登录
1
|
nano /etc/ssh/sshd_config
|
修改或者直接添加
1
2
|
PermitRootLogin yes
PasswordAuthentication yes
|
更换Debian源
备份原文件
1
2
|
mv /etc/apt/sources.list /etc/apt/sources.list.bk
|
然后编辑
1
2
|
nano /etc/apt/sources.list
|
修改为
 1
 2
 3
 4
 5
 6
 7
 8
 9
10
11
|
# 中科大源

deb https://mirrors.ustc.edu.cn/debian/ bookworm main contrib non-free non-free-firmware
deb-src https://mirrors.ustc.edu.cn/debian/ bookworm main contrib non-free non-free-firmware
deb https://mirrors.ustc.edu.cn/debian/ bookworm-updates main contrib non-free non-free-firmware
deb-src https://mirrors.ustc.edu.cn/debian/ bookworm-updates main contrib non-free non-free-firmware
deb https://mirrors.ustc.edu.cn/debian/ bookworm-backports main contrib non-free non-free-firmware
deb-src https://mirrors.ustc.edu.cn/debian/ bookworm-backports main contrib non-free non-free-firmware
deb https://mirrors.ustc.edu.cn/debian-security/ bookworm-security main contrib non-free non-free-firmware
deb-src https://mirrors.ustc.edu.cn/debian-security/ bookworm-security main contrib non-free non-free-firmware
|
更新
1
|
apt update && apt upgrade -y
|
查看核显驱动
有 renderD128 和 card0 就正常
开启低电压编码器HUC GUC
修改
1
|
nano /etc/modprobe.d/i915.conf
|
添加
1
|
options i915 enable_guc=3
|
创建文件夹
1
|
mkdir -p /lib/firmware/i915 && cd /lib/firmware/i915
|
这里和LXC容器不一样,这一步你需要到宿主机目录把他的guc huc 文件都拉过来
即 PVE 下的 /lib/firmware/i915 文件夹中的文件 下载传输到KVM虚拟机的/lib/firmware/i915目录中
reboot 重启,重启完成后查看GUC和HUC状态
1
|
journalctl -b -o short-monotonic -k | egrep -i "i915|dmr|dmc|guc|huc"
|
返回信息中有huc guc 加载成功提示
1
2
3
4
5
|
[    3.862964] pve kernel: i915 0000:00:02.0: [drm] Finished loading DMC firmware i915/icl_dmc_ver1_09.bin (v1.9)
[    3.884978] pve kernel: i915 0000:00:02.0: [drm] GuC firmware i915/ehl_guc_70.1.1.bin version 70.1
[    3.884987] pve kernel: i915 0000:00:02.0: [drm] HuC firmware i915/ehl_huc_9.0.0.bin version 9.0
[    3.899160] pve kernel: i915 0000:00:02.0: [drm] HuC authenticated
[    3.899505] pve kernel: i915 0000:00:02.0: [drm] GuC submission enabled
|
安装docker
1
2
|
apt install curl -y
curl -sSL https://get.docker.com/ | sh
|
启动docker服务
安装portainer
管理:http://ip:9000
1
|
docker run -d -p 9000:9000 -v /var/run/docker.sock:/var/run/docker.sock --restart=always --name portainer portainer/portainer-ce
|
安装 clouddrive2
管理:http://ip:19798
一键脚本
1
|
curl -fsSL "https://raw.githubusercontent.com/sublaim/clouddrive2/main/cd2.sh" | bash -s install
|
登录并设置挂载
安装N大Jellyfin
1
|
docker run -d -p 8096:8096 -p 8920:8920 --volume jellyfin-config:/config --volume jellyfin-cache:/cache -v /mnt/share_nfs:/media --device=/dev/dri:/dev/dri --restart=always --name jellyfin nyanmisaka/jellyfin:240126-amd64
|
编辑容器,关闭自启动,修改媒体库为刚刚cd2设置的挂载点
安装GPU监控应用
1
|
apt-get update && apt install intel-gpu-tools
|
解决cd2报 IO Error mount point is not empty 错误问题
前提条件是关闭jellyfin 自动启动,因为它启动的早于cd2挂载,到时cd2不再挂载
关闭jellyfin容器自动启动 用系统的systemd 给容器延迟20秒启动 让它启动在挂载后面
先通过以下命令对systemd注入rc-local服务:
 1
 2
 3
 4
 5
 6
 7
 8
 9
10
11
12
13
14
15
16
|
cat>>/etc/systemd/system/rc-local.service<<EOF

[Unit]
Description=/etc/rc.local
ConditionPathExists=/etc/rc.local
[Service]
Type=forking
ExecStart=/etc/rc.local start
TimeoutSec=0
StandardOutput=tty

RemainAfterExit=yes
SysVStartPriority=99
[Install]
WantedBy=multi-user.target
EOF
|
然后执行开机启动rc.local
1
|
systemctl enable rc-local.service
|
创建开始脚本
1
2
3
4
5
6
|
cat <<EOF >/etc/rc.local
#!/bin/bash
sleep 20
docker start jellyfin
exit 0
EOF
|
并给文件赋权限
启动 rc-local 服务:
1
|
systemctl enable --now rc-local
|
查看 rc-local 状态
1
|
systemctl status rc-local.service
|
Jellyfin 设置
在jellyfin中解码器可以选择QSV+openCL
如果是开启了sriov的vf 就只能选择VAAPI+VPP
本文探讨是传统直通方式,intel的U 优先选择QSV+openCL
相比 QSV+VPP 和 VAAPI+VPP个人感觉更舒服些。不引战 大伙自己测试
验证解码
播放一个视频,打开SSH查看gpu工作状态


 支付宝
支付宝
 微信
微信